Post by duan on Aug 15, 2007 19:38:54 GMT -5
HAVE ANYTHING TO ADD? PM Me with you suggestion and Ill add it in this thread.
-----------------------------------------------------------------------------------
Resources:
Unmarked Proto's:
s21.photobucket.com/albums/b283/Thuganomics420
(Remove the *)
Reference Pics:
www.obsessedwithwrestling.com
www.wwe.com
So you want to jump on the Photoshop Figures bandwagon, well its pretty easy and really doesn’t take too much effort to achieve a decent looking figure. If I managed to get to grips with it then anyone can!
Firstly the most important thing you will need is – as the name suggests – Adobe Photoshop, how you acquire that is up to you and your conscience! You can definitely buy it from loads of places, but it ain’t cheap…so like most things I hear there are more illegitimate ways of getting it, but lets leave it at that!
So you’ve got yourself a copy of the almighty Photoshop and now its time to begin!
This guide is a guide to making figures, so you are going to need to know how to use Photoshop a little as well.
1.You need a wrestler, its always a good idea to think about 2 things when coming up with someone…can you find a good head shot of them for later (see below) and will you be able to find parts that fit (again see below)? Its worth pointing out there are two sites that you need to know about that are basically the holy grail for me, www.obsessedwithwrestling.com (for your reference pics and ideas) and s21.photobucket.com/albums/b283/Thuganomics420/ (for the figure parts, bodies etc). I use “obsessed with wrestling” a lot for ideas if I’m doing a comp and for important attire shots, and without Thuganomics420 you will really struggle to compose a figure!
So once you’ve got you reference pics its time to start the fun bit!
I decided to make Kenny from the Spirit Squad so here are my reference pics


2. So now Ive got my reference pics, and now I need my body parts to put the figure together. I always go to the Thuganomics site simply because its full of old and new prototypes that are of good quality and sized pictures.
Its also worth pointing out that if you can try and get one complete proto and edit it then that’s much easier, but if you cant then make sure your legs and torso are gonna work together…you will see what I mean! So I want baggy pants preferably quite plain, with a cruiserweight torso that is also plain…I have chosen this Shawn Michaels:
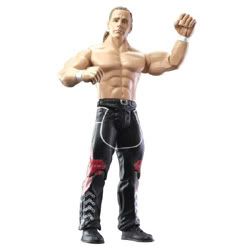
Ok so its not perfect but we can work with it!
3. Now copy your proto and open Photoshop with a dpi of 100-150 and the pixels and page size should be correct to the proto u have copied. So now paste the proto onto the blank page and your ready…I hope that makes sense, but you may want to play with the pixels and dpi for yourself!
I reckon I should start on the pants and take off the pattern first. I’m not gonna walk you through all of that, but you need to select a brush size and shape that you feel is correct and then take a sample of a colour you want to cover the pattern up. So I want black for the underlying colour and highlights of grey and white to follow the creases and shades of the pants…ok I’ll show you!
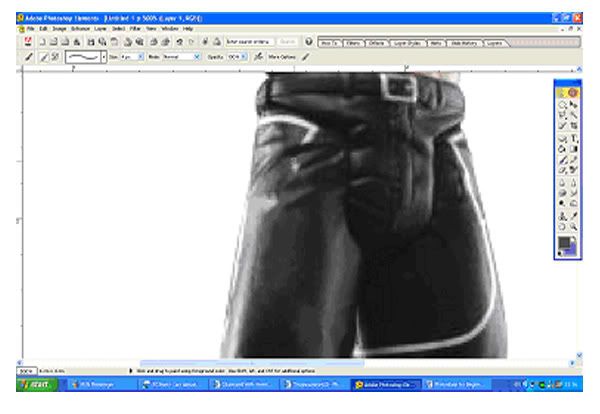
Get it? But you do have to be patient and vary brush strokes and colours to get a good “natural” effect. Don’t forget your brush is far smoother than a picture close up off the internet!
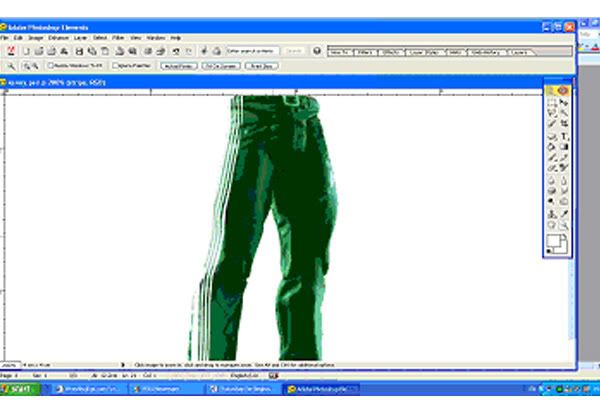
Right so Ive done that now I need to change the colour, depending on the version of Photoshop you’ve got you can do this in different ways. I use Colour variations to increase the green in the trousers, but don’t do it straight away… firstly use the magic wand tool and click on the white area around the figure and delete, this will mean there is no white area around the figure that can also be edited. Then lasso around the pants so that the colour change is specific to the pants.
Now to the stripes and its pretty easy really to do this, once again this is where the reference pics come in handy. Its one white large stripe, and the adidas stripes inside that. So use the lasso tool and lasso the big white stripe first, now create a new layer...and fill in the lassoed area with white. Now for the little stripes, deselect the lasso and great a much smaller one because you will need to fit 3 in. When you are happy – and making sure you are on the correct layer, delete the small area of white therefore creating a thin line of green. Then with the lasso tool selected move the selected area to the next spot and delete…and then again.
Obviously your not always gonna need stripes on pants, but it’s an example of ways to utilize photoshop to your advantage, whether it be logos or differing pant colours, some of those techniques will help. You will have to use your brain which ever figure you choose!
4. Now the torso will be quite a bit harder I think. Firstly click onto the figure layer and start lassoing the arms to make sleeves, then remove the colour or de-saturate it, to leave the arms black and white. Next with the arms still lassoed fiddle with brighness and contrast till you are happy with the shade and definition of the arms. I also use the smudge tool just to smooth out any creases.
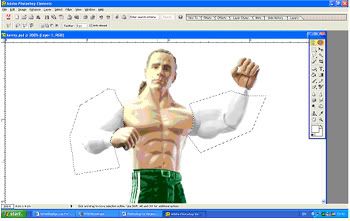
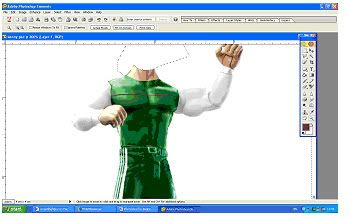
And then quite simply do the torso area, again this is pretty easy, just do the same things as the sleeves, this time make it green. Just make sure there is a neck to the shirt! Then do the patterns, using layers and lasso’s like the stripes on the pants.
5. Now to the head, the bit that really makes the figure, like I said at the beginning of this tutorial u will need a good head shot of the Kenny. As you can see the Michaels head already on looks forward at the camera and is tilted slightly…so u will need a head picture assuming that sort of position. But we need to get rid of this one first! It’s really easy, just lasso around it and delete or use the eraser tool.
Now get your picture, I chose the above reference pic as it seems to me it will work. The most important thing in my opinion is to make the head look “plastic-like”, after all it is a figure! So if you pick a guy with long frizzy hair that’s gonna look odd as a figure head so try to contain it a bit. Anyways u get the pic which will also need to be a good size, now lasso around the head in the picture and then right click – layer via cut. And delete the rest of the picture you don’t need.
Right now it gets a bit more complicated. There are several ways to do the head and achieve the smooth plastic look, one way is to apply a smart blur filter to the whole head to get a good look. The other way is to apply the accented edges filter to the head and use the smooth tool.
However a more detailed way that I usually use is to lasso around the fleshy areas of the head and remove the colour this means there will be no differing skin colours on the head. Then add the colour back in that matches the flesh colour on the neck and hands etc (that can take a while). Then do the same thing to the hair, and add a colour that you think suits. Also use the smudge tool to take out any blemishes etc. Your nearly done just scale the head correctly and tidy up and imperfections
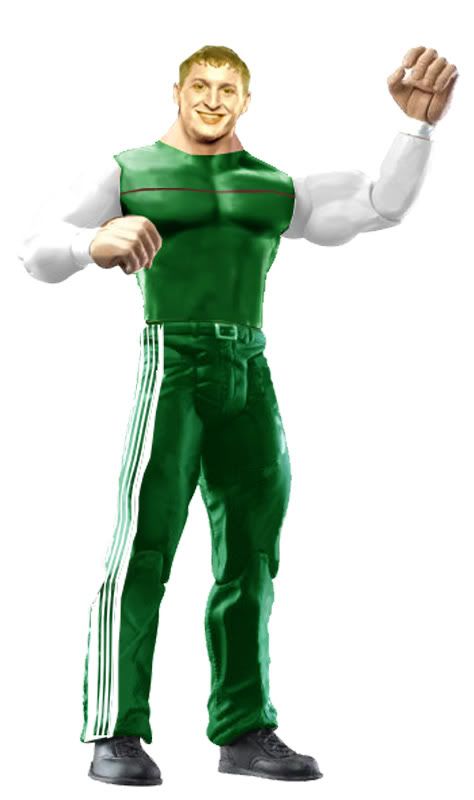
6. Now to the finishing touches, u may want to add creases to the pants and stripes I usually use the burn and opaque tools for that. And just generally tidy it up. The final details, tidy edges and neat outlines make a big difference overall I think.
And that’s your figure. Save it as a JPEG and upload it however you choose.
I hope that helps and isn’t too overwhelming, but my way isn’t necessarily the right way and is really only a guide to putting it together. You will have to use your own ideas and techniques to come up with a good figure!
Just give it a try!
Credit: flying-shorty
-----------------------------------------------------------------------------------
Alright. I am going to be adding a few tips here. Since a LOT of people on here don't quite fully understand an easy way to color figures to make them look decent and to still show detail on the figure. I am going to show how to recolor something, and also how to change something that is black, such as tights, to something with color.
1st tip.
How to recolor something using Hue/Saturation.
First you select your figure of choosing. I'm going with a DA Kenny.

Then select the part of the figure you want to recolor. I used the tights. Now go ahead and copy and paste that to make a new layer.

Then at the top, click Image - Adjustments - Hue Saturation.

I wanted to change the tights to make them light blue so I moved the Hue bar over to get the color I wanted for the tights.

Then, simply zoom in, grab the eraser tool and erase the part you don't want colored, in this case, the skin portion of the figure.

Then you have a simple recolor that still shows detail.

2nd Tip.
Giving a black object color.
Alright. I took a figure that is wearing a black attire. In this case, it is a DA Tommy Dreamer.

You're going to Copy and Paste the whole thing this time. So hold the Ctrl key down and hit A. That will select the whole layer. Then hold Ctrl and hit C then V. Which will Copy and Paste the layer. Then at the top Select Image - Adjustments - Levels.

Then move the middle bar over to the left until the image gets white, but not so white that you can't see any detail.

Then at the top select Image- Adjustments- Color Balance. I went and moved the bottom bar all the way to blue.

Then I went again and did that again to make it more blue.

Then I selected the erased tool and erased the parts that I didn't want colored, such as the arms, head and feet.

You can also just go ahead and skip the levels step. But I find it easier to work with lighter colors. You can always go and darken them later.
Here is what it looks like skipping the "Level" step.

Dielawn Out.
I went and found a figure that already didn't have matching skin tone which was an RA Chris Masters. As you can see the body has to much magenta color in it.

Now I went and copied the whole layer and pasted it. So I had two layers of Chris Masters. I then went and changed the first layer and put it at 0 Opacity, and then erased the head on the top layer.


Then I changed the opacity of the first layer of Chris Masters to show the head again. This time we have the first layer, with a head with another layer of Chris Masters over top the first layer, without a head.

Next selecting the top layer, which is just the body, select Image- Adjustments- Hue/ Saturation.
Then begin to slide the middle bar over to begin to get rid of some of the color so it is not so magenta, and slide the top bar over a bit to give it more of a tan/yellow color to it.

Then select the first Chris Masters layer, which has the head on it, and do the same as you did for the body. Image- Adjustments- Hue Saturation, but this time just move the saturation over a bit to remove a bit of the magenta that was in the face.

Then the skin tones should be close to matching.

You can do this with just about any skin color tone. Mainly, you need to work on the saturation and lower it usually. I find it best to work with a lower saturated skin tone and then just add a bit of yellow to it.
Before and After:

Here's another tip. Joey asked me to post this.
Tattoos.
For this I used an Adrenaline Umaga and decided to add his stomach tattoo.

First go and grab whatever figure you want and find another pic that has the tattoo you want to add to it. Then select the portion you want, copy and then paste it.

Then once that is copied and pasted onto the figure, go ahead and erase around the tattoo to remove any of the skin color that was on it before.

While still on the new "Tattoo" layer, right click then select Free Transform- Warp.

I noticed the S and A on the tattoo were smushed together so I went and stretched that side out to make it fit a bit better.

Next I went to Image- Adjustments- Hue Saturation and removed all of the saturation by sliding the middle bar all the way to the left.

Then since the shadows and higlights on the "Tattoo" layer were oposite of the body shadows and highlights, I used the burn tool to make the tattoo all one darkness.

Then using the dropper tool, I found a darker part of skin tone on the figure to used to recolor the tattoo. I selected the color from the arm. I then selected the color replacement tool and went over the tattoo.

To make the tattoo not so bland, I added highlights on the "Tattoo" layer using the dodge tool to match the highlights on the body layer.

Then you have a nice looking tattoo.

Alright, the time just about everyone on here has been waiting for.
Dielawn's tips for making a head look like a figure.
First grab whatever figure you are using, and whatever head you plan to use. I went with a DA Helms and a Helms head.
So first zoom into the head.

Then using the blur tool, set at 100% blur the skin. DO NOT GO OVER CREASES ON THE FACE (Nose, Eyes, Beard, Ears)

Then zoom into the eye, select the parts that are white.

Use the sponge tool to remove all color from the selected part, and then use the dodge tool to make them white. Repeat for the second eye.

Next select the facial hair. Then copy and paste it.

After the layer is pasted, go to the Filters and select Texturize.

Then erase where the mouth and chin part are, where there isn't facial hair. Then use the burn tool to make it darker to match the hair color.

Then lower the opacity so it doesn't stick out so much.

Then erase the existing head from the body, and all of the background from the head youre using.

Then place the head on the body and resize it to make it fit.

If the head has accessories, such as this hat, go ahead and copy and paste it.

Then select the new layer, and blur it, and erase any extra that you may have copied. And place it back on the figure.

Then make the skintone on the head match the figure. I noticed the head had too much color to it, so I lowered the Saturation.

Then add highlights using the dodge tool. Remember, the tops of noses, chins and cheek bones will always have more highlights than the rest of a head.

Now moving onto the hat. You need to always see where the light is shining on the figure. With this one, you can see its shining on the left.

That means you need to add highlights onto the left side of the hat using the dodge tool.

Now I zoomed out to show you the head before and after.

Then you're done.

Credit: Dielawn
-----------------------------------------------------------------------------------
OK, Paint tips:
Basicly it isn't a very good program at all, What I used to do is mainly part switches and as little recolouring as possible. Take your UF Jeff for example, the shirt, look for a white tank top you could put over the top of him, if you can't find one anywhere either use a real picture of one or draw over the lines carefully. Same with the pants and stuff, don't think if you use a real pic it will look messy as pretty much anyway with a paint figure it turns out sloppy or messy. And for the heads use figure heads mostly, doing a real picture head looks pretty messy. If your figure has no previous figures ever use a video game ref pic (SDvRaw '07 for example) or if you can't find any decent ones this is pretty much a last resort, zoom in on the face and take a sample of the eyes colour edit the colour and make it a little lighter. and paint all the white in the eyes the same colour white and on the skin whenever the skincolour changes on the picture sample it and paint on the face until you get to the next different tone on the head and continue ect ect, to give it a smoother, plastic look. Also to give it a shine take a colour sample of the top of the head and lighten it a little bit and make a short line around the top of the head to make it shiny look you should get the picture.
Paint is pretty much a last resort, it takes a long time to master and takes a very long time to make those half decent figures. I'd advise trying to get PS a much supiriour program or even just get GIMP (search GIMP on google and dl, its free.)
Credit: CJ
-----------------------------------------------------------------------------------
I found my old tutorial can you add it to the post please:
ok so there's already been a photoshopped figure tutorial but I thought id make my own
to start off with you need an idea of a figure to make.... I think ill make wolfpac Sting
Now find a good proto, there are two places to find good protos spamuk and s21.photobucket.com/albums/b283/Thuganomics420/ both are good figureimages is good if you know what you want an is more up to date and thuganomics is better to find certain parts eg. the new fat shirt torso mold
for sting i will use a cs9 hawk that somebody modified because i need the kickpads
Picture will change every 10 seconds
to start off with select the torso area, with the polygon selection tool, and erase it because you wont need it
now you have the tights you want without the torso it came with... but what torso do we use
open a suitable file to use for the torso, i chose an undertaker proto (not sure which series) and select the torso
now copy it into your first image either by pressing ctrl + c to copy and ctrl + v to paste.
Now both images are together but the torso is too
right click on the image and select free transform, now you can change the image size at your will until you feel it's appropriate
now the sting im trying to make has red boots so select the boots like i have done in the picture and select image>adjustments>hue/saturation then change the boot colour to red using the setting that i used in the picture, for black boots or white boots you will need to select colourize
now we have a good sting body but no head
first find a suitable head and select the area you want then copy it into your project and resize it
here's the most important part plasticness:
to start smudge the areas of flesh until the face looks smooth and unblemished and then select the dodge tool at an appropriate size and use it on the areas of flesh you fell should be shiny then smudge the skin afterwards to smooth it out again
simple, eh?
now you should have a decent figure
if you want to add extras sometimes it helps to add it in logos and borders also see flying shorty's tutorial to do finer details eg. removing tattoos

Credit: MJH
-----------------------------------------------------------------------------------
Photoshop Figure Tutorial for Beginners
Resources:
Unmarked Proto's:
s21.photobucket.com/albums/b283/Thuganomics420
(Remove the *)
Reference Pics:
www.obsessedwithwrestling.com
www.wwe.com
So you want to jump on the Photoshop Figures bandwagon, well its pretty easy and really doesn’t take too much effort to achieve a decent looking figure. If I managed to get to grips with it then anyone can!
Firstly the most important thing you will need is – as the name suggests – Adobe Photoshop, how you acquire that is up to you and your conscience! You can definitely buy it from loads of places, but it ain’t cheap…so like most things I hear there are more illegitimate ways of getting it, but lets leave it at that!
So you’ve got yourself a copy of the almighty Photoshop and now its time to begin!
This guide is a guide to making figures, so you are going to need to know how to use Photoshop a little as well.
1.You need a wrestler, its always a good idea to think about 2 things when coming up with someone…can you find a good head shot of them for later (see below) and will you be able to find parts that fit (again see below)? Its worth pointing out there are two sites that you need to know about that are basically the holy grail for me, www.obsessedwithwrestling.com (for your reference pics and ideas) and s21.photobucket.com/albums/b283/Thuganomics420/ (for the figure parts, bodies etc). I use “obsessed with wrestling” a lot for ideas if I’m doing a comp and for important attire shots, and without Thuganomics420 you will really struggle to compose a figure!
So once you’ve got you reference pics its time to start the fun bit!
I decided to make Kenny from the Spirit Squad so here are my reference pics
2. So now Ive got my reference pics, and now I need my body parts to put the figure together. I always go to the Thuganomics site simply because its full of old and new prototypes that are of good quality and sized pictures.
Its also worth pointing out that if you can try and get one complete proto and edit it then that’s much easier, but if you cant then make sure your legs and torso are gonna work together…you will see what I mean! So I want baggy pants preferably quite plain, with a cruiserweight torso that is also plain…I have chosen this Shawn Michaels:
Ok so its not perfect but we can work with it!
3. Now copy your proto and open Photoshop with a dpi of 100-150 and the pixels and page size should be correct to the proto u have copied. So now paste the proto onto the blank page and your ready…I hope that makes sense, but you may want to play with the pixels and dpi for yourself!
I reckon I should start on the pants and take off the pattern first. I’m not gonna walk you through all of that, but you need to select a brush size and shape that you feel is correct and then take a sample of a colour you want to cover the pattern up. So I want black for the underlying colour and highlights of grey and white to follow the creases and shades of the pants…ok I’ll show you!
Get it? But you do have to be patient and vary brush strokes and colours to get a good “natural” effect. Don’t forget your brush is far smoother than a picture close up off the internet!
Right so Ive done that now I need to change the colour, depending on the version of Photoshop you’ve got you can do this in different ways. I use Colour variations to increase the green in the trousers, but don’t do it straight away… firstly use the magic wand tool and click on the white area around the figure and delete, this will mean there is no white area around the figure that can also be edited. Then lasso around the pants so that the colour change is specific to the pants.
Now to the stripes and its pretty easy really to do this, once again this is where the reference pics come in handy. Its one white large stripe, and the adidas stripes inside that. So use the lasso tool and lasso the big white stripe first, now create a new layer...and fill in the lassoed area with white. Now for the little stripes, deselect the lasso and great a much smaller one because you will need to fit 3 in. When you are happy – and making sure you are on the correct layer, delete the small area of white therefore creating a thin line of green. Then with the lasso tool selected move the selected area to the next spot and delete…and then again.
Obviously your not always gonna need stripes on pants, but it’s an example of ways to utilize photoshop to your advantage, whether it be logos or differing pant colours, some of those techniques will help. You will have to use your brain which ever figure you choose!
4. Now the torso will be quite a bit harder I think. Firstly click onto the figure layer and start lassoing the arms to make sleeves, then remove the colour or de-saturate it, to leave the arms black and white. Next with the arms still lassoed fiddle with brighness and contrast till you are happy with the shade and definition of the arms. I also use the smudge tool just to smooth out any creases.
And then quite simply do the torso area, again this is pretty easy, just do the same things as the sleeves, this time make it green. Just make sure there is a neck to the shirt! Then do the patterns, using layers and lasso’s like the stripes on the pants.
5. Now to the head, the bit that really makes the figure, like I said at the beginning of this tutorial u will need a good head shot of the Kenny. As you can see the Michaels head already on looks forward at the camera and is tilted slightly…so u will need a head picture assuming that sort of position. But we need to get rid of this one first! It’s really easy, just lasso around it and delete or use the eraser tool.
Now get your picture, I chose the above reference pic as it seems to me it will work. The most important thing in my opinion is to make the head look “plastic-like”, after all it is a figure! So if you pick a guy with long frizzy hair that’s gonna look odd as a figure head so try to contain it a bit. Anyways u get the pic which will also need to be a good size, now lasso around the head in the picture and then right click – layer via cut. And delete the rest of the picture you don’t need.
Right now it gets a bit more complicated. There are several ways to do the head and achieve the smooth plastic look, one way is to apply a smart blur filter to the whole head to get a good look. The other way is to apply the accented edges filter to the head and use the smooth tool.
However a more detailed way that I usually use is to lasso around the fleshy areas of the head and remove the colour this means there will be no differing skin colours on the head. Then add the colour back in that matches the flesh colour on the neck and hands etc (that can take a while). Then do the same thing to the hair, and add a colour that you think suits. Also use the smudge tool to take out any blemishes etc. Your nearly done just scale the head correctly and tidy up and imperfections
6. Now to the finishing touches, u may want to add creases to the pants and stripes I usually use the burn and opaque tools for that. And just generally tidy it up. The final details, tidy edges and neat outlines make a big difference overall I think.
And that’s your figure. Save it as a JPEG and upload it however you choose.
I hope that helps and isn’t too overwhelming, but my way isn’t necessarily the right way and is really only a guide to putting it together. You will have to use your own ideas and techniques to come up with a good figure!
Just give it a try!
Credit: flying-shorty
-----------------------------------------------------------------------------------
Alright. I am going to be adding a few tips here. Since a LOT of people on here don't quite fully understand an easy way to color figures to make them look decent and to still show detail on the figure. I am going to show how to recolor something, and also how to change something that is black, such as tights, to something with color.
1st tip.
How to recolor something using Hue/Saturation.
First you select your figure of choosing. I'm going with a DA Kenny.
Then select the part of the figure you want to recolor. I used the tights. Now go ahead and copy and paste that to make a new layer.
Then at the top, click Image - Adjustments - Hue Saturation.
I wanted to change the tights to make them light blue so I moved the Hue bar over to get the color I wanted for the tights.
Then, simply zoom in, grab the eraser tool and erase the part you don't want colored, in this case, the skin portion of the figure.
Then you have a simple recolor that still shows detail.
2nd Tip.
Giving a black object color.
Alright. I took a figure that is wearing a black attire. In this case, it is a DA Tommy Dreamer.
You're going to Copy and Paste the whole thing this time. So hold the Ctrl key down and hit A. That will select the whole layer. Then hold Ctrl and hit C then V. Which will Copy and Paste the layer. Then at the top Select Image - Adjustments - Levels.
Then move the middle bar over to the left until the image gets white, but not so white that you can't see any detail.
Then at the top select Image- Adjustments- Color Balance. I went and moved the bottom bar all the way to blue.
Then I went again and did that again to make it more blue.
Then I selected the erased tool and erased the parts that I didn't want colored, such as the arms, head and feet.
You can also just go ahead and skip the levels step. But I find it easier to work with lighter colors. You can always go and darken them later.
Here is what it looks like skipping the "Level" step.
Dielawn Out.
I went and found a figure that already didn't have matching skin tone which was an RA Chris Masters. As you can see the body has to much magenta color in it.
Now I went and copied the whole layer and pasted it. So I had two layers of Chris Masters. I then went and changed the first layer and put it at 0 Opacity, and then erased the head on the top layer.
Then I changed the opacity of the first layer of Chris Masters to show the head again. This time we have the first layer, with a head with another layer of Chris Masters over top the first layer, without a head.
Next selecting the top layer, which is just the body, select Image- Adjustments- Hue/ Saturation.
Then begin to slide the middle bar over to begin to get rid of some of the color so it is not so magenta, and slide the top bar over a bit to give it more of a tan/yellow color to it.
Then select the first Chris Masters layer, which has the head on it, and do the same as you did for the body. Image- Adjustments- Hue Saturation, but this time just move the saturation over a bit to remove a bit of the magenta that was in the face.
Then the skin tones should be close to matching.
You can do this with just about any skin color tone. Mainly, you need to work on the saturation and lower it usually. I find it best to work with a lower saturated skin tone and then just add a bit of yellow to it.
Before and After:
Here's another tip. Joey asked me to post this.
Tattoos.
For this I used an Adrenaline Umaga and decided to add his stomach tattoo.
First go and grab whatever figure you want and find another pic that has the tattoo you want to add to it. Then select the portion you want, copy and then paste it.
Then once that is copied and pasted onto the figure, go ahead and erase around the tattoo to remove any of the skin color that was on it before.
While still on the new "Tattoo" layer, right click then select Free Transform- Warp.
I noticed the S and A on the tattoo were smushed together so I went and stretched that side out to make it fit a bit better.
Next I went to Image- Adjustments- Hue Saturation and removed all of the saturation by sliding the middle bar all the way to the left.
Then since the shadows and higlights on the "Tattoo" layer were oposite of the body shadows and highlights, I used the burn tool to make the tattoo all one darkness.
Then using the dropper tool, I found a darker part of skin tone on the figure to used to recolor the tattoo. I selected the color from the arm. I then selected the color replacement tool and went over the tattoo.
To make the tattoo not so bland, I added highlights on the "Tattoo" layer using the dodge tool to match the highlights on the body layer.
Then you have a nice looking tattoo.
Alright, the time just about everyone on here has been waiting for.
Dielawn's tips for making a head look like a figure.
First grab whatever figure you are using, and whatever head you plan to use. I went with a DA Helms and a Helms head.
So first zoom into the head.
Then using the blur tool, set at 100% blur the skin. DO NOT GO OVER CREASES ON THE FACE (Nose, Eyes, Beard, Ears)
Then zoom into the eye, select the parts that are white.
Use the sponge tool to remove all color from the selected part, and then use the dodge tool to make them white. Repeat for the second eye.
Next select the facial hair. Then copy and paste it.
After the layer is pasted, go to the Filters and select Texturize.
Then erase where the mouth and chin part are, where there isn't facial hair. Then use the burn tool to make it darker to match the hair color.
Then lower the opacity so it doesn't stick out so much.
Then erase the existing head from the body, and all of the background from the head youre using.
Then place the head on the body and resize it to make it fit.
If the head has accessories, such as this hat, go ahead and copy and paste it.
Then select the new layer, and blur it, and erase any extra that you may have copied. And place it back on the figure.
Then make the skintone on the head match the figure. I noticed the head had too much color to it, so I lowered the Saturation.
Then add highlights using the dodge tool. Remember, the tops of noses, chins and cheek bones will always have more highlights than the rest of a head.
Now moving onto the hat. You need to always see where the light is shining on the figure. With this one, you can see its shining on the left.
That means you need to add highlights onto the left side of the hat using the dodge tool.
Now I zoomed out to show you the head before and after.
Then you're done.
Credit: Dielawn
-----------------------------------------------------------------------------------
OK, Paint tips:
Basicly it isn't a very good program at all, What I used to do is mainly part switches and as little recolouring as possible. Take your UF Jeff for example, the shirt, look for a white tank top you could put over the top of him, if you can't find one anywhere either use a real picture of one or draw over the lines carefully. Same with the pants and stuff, don't think if you use a real pic it will look messy as pretty much anyway with a paint figure it turns out sloppy or messy. And for the heads use figure heads mostly, doing a real picture head looks pretty messy. If your figure has no previous figures ever use a video game ref pic (SDvRaw '07 for example) or if you can't find any decent ones this is pretty much a last resort, zoom in on the face and take a sample of the eyes colour edit the colour and make it a little lighter. and paint all the white in the eyes the same colour white and on the skin whenever the skincolour changes on the picture sample it and paint on the face until you get to the next different tone on the head and continue ect ect, to give it a smoother, plastic look. Also to give it a shine take a colour sample of the top of the head and lighten it a little bit and make a short line around the top of the head to make it shiny look you should get the picture.
Paint is pretty much a last resort, it takes a long time to master and takes a very long time to make those half decent figures. I'd advise trying to get PS a much supiriour program or even just get GIMP (search GIMP on google and dl, its free.)
Credit: CJ
-----------------------------------------------------------------------------------
I found my old tutorial can you add it to the post please:
ok so there's already been a photoshopped figure tutorial but I thought id make my own
to start off with you need an idea of a figure to make.... I think ill make wolfpac Sting
Now find a good proto, there are two places to find good protos spamuk and s21.photobucket.com/albums/b283/Thuganomics420/ both are good figureimages is good if you know what you want an is more up to date and thuganomics is better to find certain parts eg. the new fat shirt torso mold
for sting i will use a cs9 hawk that somebody modified because i need the kickpads
Picture will change every 10 seconds
to start off with select the torso area, with the polygon selection tool, and erase it because you wont need it
now you have the tights you want without the torso it came with... but what torso do we use
open a suitable file to use for the torso, i chose an undertaker proto (not sure which series) and select the torso
now copy it into your first image either by pressing ctrl + c to copy and ctrl + v to paste.
Now both images are together but the torso is too
right click on the image and select free transform, now you can change the image size at your will until you feel it's appropriate
now the sting im trying to make has red boots so select the boots like i have done in the picture and select image>adjustments>hue/saturation then change the boot colour to red using the setting that i used in the picture, for black boots or white boots you will need to select colourize
now we have a good sting body but no head
first find a suitable head and select the area you want then copy it into your project and resize it
here's the most important part plasticness:
to start smudge the areas of flesh until the face looks smooth and unblemished and then select the dodge tool at an appropriate size and use it on the areas of flesh you fell should be shiny then smudge the skin afterwards to smooth it out again
simple, eh?
now you should have a decent figure
if you want to add extras sometimes it helps to add it in logos and borders also see flying shorty's tutorial to do finer details eg. removing tattoos
Credit: MJH