

Post by J-Swift on Jul 2, 2009 16:50:24 GMT -5

Ok Here is how i did American Dragon, Bryan Danielson
First, I chose the color of his trunks, which is kinda burgundyish, and did the tights.
Second, I colored the Kneepads Burgundy using the soft light brush.
Third, Since I used a Gene Snitsky, I had to smudge the Laces off the boots.
After that, I smudged the boot Line to make it look like the socks were apart of the boots.
Then after i did the smudging, I colored the boots/Socks Burgundy.
Then I noticed, he needs his Kicker Outlines! So I hit Soft light brush, and clicked black. I made the outlines straight (sorta) by clicking the mouse once to make the starting point, pressed shift, and clicked where i wanted the straight line to end. To make straight lines, hold the shift key.
After that, I colored the Wrist bands a couple shades of white (2 or 3 i think)
Now, I was ready for the head! I erased the head by using the eraser tool in Gimp.
Then, I went to look for Ref pics. I chose this one:
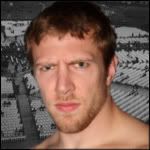
I opened up Paint (OmG) and Resized the pic to almost where is was mostly the head. I saved it, and clicked back into Gimp.
After that, I opened it as a layer, and erased the remnants of the background. I placed it on the head, and clicked merge down.
After that, I smudged/blur the head to make it look more plasticy.
Finally, I finished and saved it.
Upload it to PhotoBucket and there you go!
------------------------
Place to get crisp high resolution figure images: figure*images.co.uk (remove the star)
Figure used - Gene Snitsky DA 11
Brushes used - Soft Light (Good for darker colors) and Color (Good for light colors)
Gimp version used - Gimp 2.6
Tips - Use the soft light brush for Black and Whites, as they wont turn gray like if you use Color.
I think your supposed to use saturation on the head, which I forgot to do. Not sure on that. Sorry.
Have fun making PS figs in GIMP!
EDIT: Dont use Saturation. Use Hue.
And sorry about the skintones not matching, couldnt get them to match.


 .
.