Post by ● kaneisdaman ● on Dec 28, 2007 10:37:52 GMT -5
NOTE: I have reposted this since the last one was wiped, please leave comments even if you did in the last one. Thanks for understanding.
----------------------
Well approximately last month I did my first ever printout of MVP Entrance set-up. I have decided to continue making printouts and this time I present to you the 2007 ECW stage printout. I put a fair bit of work into this so if you view, please just leave a reply.
NOTE: All should print out to the correct size when printed via Photoshop (if you don’t have it use another program maybe even word and paint to resize it accordingly).
Now the sizing of this gets huge so I have done some variations. This will fit an RA khali and that is why it’s so large. Also, I advise using cardboard for this but it isn’t essential. Cardboard helps though.
----------------------------------------
Thumbnails
Here are thumbnail views just to show you the options. These aren’t the properly sized ones. These are the thumbnails showing the two sections for the printout and the options I have given you for the second part.
Part A:

Part B:
Option 1: Full screen and curtain

Option 2: Reduced size screen and reduced size curtain

Option 3: No screen with reduced size curtain (is actually a reduced size curtain but not exemplified accurately here because it is scaled up compared to thumbnail above)

----------------------------------------
Links
These are the properly sized printout. I have given links to prevent making this thread a killer as far as downloading goes. Use these ones to printout. As mentioned they are sized correctly in Photoshop but if you don’t have it use another program maybe even word and paint to resize it accordingly.
Part A:
img255.imageshack.us/img255/6118/partaproperzl8.gif
Part B:
Option 1: Full screen and curtain (Approx 50cmx100cm)
aycu20.webshots.com/image/36379/2000393578718363781_rs.jpg
Option 2: Reduced size screen and reduced size curtain (Approx 40cmx60cm)
img442.imageshack.us/img442/1310/partb2propergk0.gif
Option 3: No screen with reduced size curtain (Approx 22x60cm)
img444.imageshack.us/img444/7909/partb3properwt0.gif
----------------------------------------
Assembly
Now assembling this stage isn’t too hard. Here are the directions:
• Print out Part A
• Cut out all the pieces
• Fold all metal parts except for the ones directly connected to the walls. They will act as a stand to hold up the walls.
• Next fold A and C down so that the metal bit is facing down.
• Glue A to B and C to D (metal part glued to the back of the top part.
• Finally, print any part B out and get it standing or leaning/attached to a wall or something like that.
• You should be done
If any further help is needed, post here or PM me.
----------------------------------------
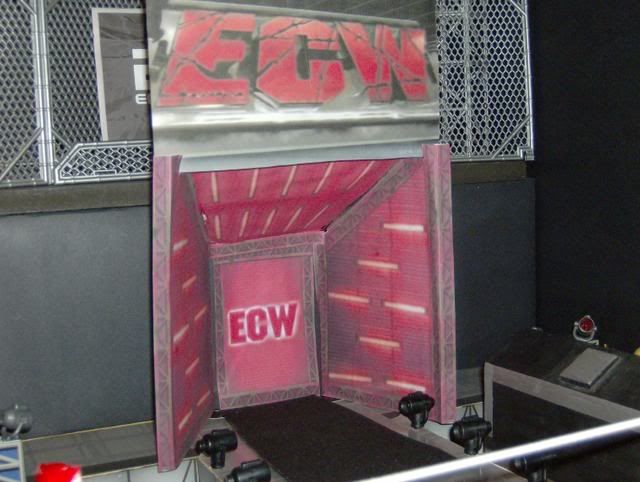
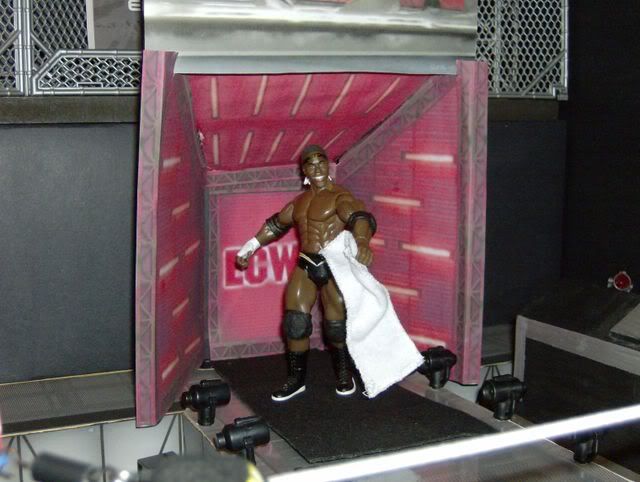
Pictures of Completed Stage
Now what would this be if I didn’t make this stage myself. So I did in a small model version. So below are two pics of my small version of the stage using Part B’s option 1.
There will be more and bigger pics of the stage posted in the custom accessories board if you are keen to see larger pics.


Thanks for looking and I hope they are of use,
kaneisdaman
----------------------
Well approximately last month I did my first ever printout of MVP Entrance set-up. I have decided to continue making printouts and this time I present to you the 2007 ECW stage printout. I put a fair bit of work into this so if you view, please just leave a reply.
NOTE: All should print out to the correct size when printed via Photoshop (if you don’t have it use another program maybe even word and paint to resize it accordingly).
Now the sizing of this gets huge so I have done some variations. This will fit an RA khali and that is why it’s so large. Also, I advise using cardboard for this but it isn’t essential. Cardboard helps though.
----------------------------------------
Thumbnails
Here are thumbnail views just to show you the options. These aren’t the properly sized ones. These are the thumbnails showing the two sections for the printout and the options I have given you for the second part.
Part A:
Part B:
Option 1: Full screen and curtain
Option 2: Reduced size screen and reduced size curtain
Option 3: No screen with reduced size curtain (is actually a reduced size curtain but not exemplified accurately here because it is scaled up compared to thumbnail above)
----------------------------------------
Links
These are the properly sized printout. I have given links to prevent making this thread a killer as far as downloading goes. Use these ones to printout. As mentioned they are sized correctly in Photoshop but if you don’t have it use another program maybe even word and paint to resize it accordingly.
Part A:
img255.imageshack.us/img255/6118/partaproperzl8.gif
Part B:
Option 1: Full screen and curtain (Approx 50cmx100cm)
aycu20.webshots.com/image/36379/2000393578718363781_rs.jpg
Option 2: Reduced size screen and reduced size curtain (Approx 40cmx60cm)
img442.imageshack.us/img442/1310/partb2propergk0.gif
Option 3: No screen with reduced size curtain (Approx 22x60cm)
img444.imageshack.us/img444/7909/partb3properwt0.gif
----------------------------------------
Assembly
Now assembling this stage isn’t too hard. Here are the directions:
• Print out Part A
• Cut out all the pieces
• Fold all metal parts except for the ones directly connected to the walls. They will act as a stand to hold up the walls.
• Next fold A and C down so that the metal bit is facing down.
• Glue A to B and C to D (metal part glued to the back of the top part.
• Finally, print any part B out and get it standing or leaning/attached to a wall or something like that.
• You should be done
If any further help is needed, post here or PM me.
----------------------------------------
Pictures of Completed Stage
Now what would this be if I didn’t make this stage myself. So I did in a small model version. So below are two pics of my small version of the stage using Part B’s option 1.
There will be more and bigger pics of the stage posted in the custom accessories board if you are keen to see larger pics.
Thanks for looking and I hope they are of use,
kaneisdaman


 (but with it being so big, you'd probably have to have some proper decent cardboard to hold it together.)