Post by Deleted on Jul 10, 2007 19:24:41 GMT -5
Hasbro customising guide:
Iv had alot of emails asking "how do i pop a hasbro torso" or, "whos head would work for.."
This post should hopefully clear some things up.
Thanks to "009" for letting me post this and also for the help Tommycoholic and Adrione for being an example to follow.
Welcome to a different side of customising, some say the cartoonier side; I would personally say the more nostalgic/intriguing side.
You cant just go to a store and buy a jakks fig, you can however get a random buzz every time you win a lot on eBay for a low price, or find 2 or 3 random hasbro figs for $0.50 at a yard sale. It’s something that drags you in. I used to customize ttls and the original BCAs but found myself needing a Hasbro fix. Cant explain why, but after you have finished your first one… you may understand the difference.
BREAKING AN ADAM BOMB FIG!! - Don’t do it.
If you’re not familiar with Hasbro’s and win a lot from eBay or whatever… please, for the love of god, don’t customise it straight away. Ask someone on here what they are worth. I am happy to help out with pricing/info/pics/general help for Hasbro questions but I may have to kill you if you paint a 123 kid into an x-Pac. Some are worth a lot of money, others arnt worth the postage.
Right, on to general tips:
Separating Hasbro figures can be a task. You need to remember that the inside of a Hasbro figure has A LOT of things going on compared to a typical jacks fig. Firstly, the mechanism: When you decide on which custom your going to make, also decide whether you want it to be playable, or not.
If you do want it playable, you will most likely want its ‘move’ to work. (i.e.: Tatanka’s body rotation double-armed clothesline).
Also, it can be tricky to successfully ‘not’ snap one of the pins on the inside of the torso; usually 4-6 plastic pins hold the front and back torso together.. Chances are, you will break them at first, but not to worry, as long as nothing prevents the front and back of the torso from closing back together (no gaps down the side or around the shoulders of the fig) then super glue will work just fine.
Popping:
Some people suggest boiling the figure as the plastic softens up and can be easier to manipulate. I personally use a Stanley Knife (heavy duty craft knife) and start at the shoulder of the fig, carefully slicing the joint. I pry it open, SLIGHTLY… and continue to do this around the entire body. Sometimes this will be enough for the torso to pop open.. If so, great.
If that doesn’t work… probably wont! I use a skinny flat-headed screwdriver after using the knife. When I say skinny, I mean the tip of the screwdriver needs to be as thin as possible… sharper, if you will.
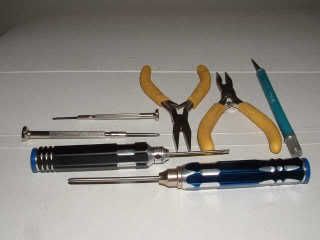
The above selection of tools is vital in my opinion; add sand paper or a selection of metal files to smooth over unwanted sections and paint.
NOT ALL TORSOS WILL FIT OTHER LEGS.
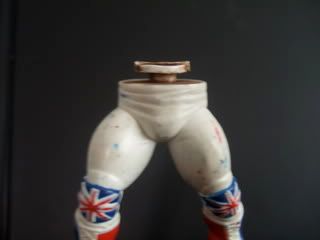
There is a circular peace of plastic moulded at the top of MOST legs. (Very similar to TTL and most other jacks figs). It’s just a point for the torso to clip around and allow rotation once joined together. Some ‘plastic circles’ are bigger than others, which means the ‘hole’ at the bottom of the torso which clip around these ‘plastic circles’ will fit specifically. I think (compare macho king - purple trunks and British bulldog) this will give you a basic example.
There is away around this: If you have a torso and the hole is to small for the plastic circle, simply sand the hole so it gets larger, use I craft knife if needs be, but be careful not to chip to much plastic off, just in case it then becomes to big for the legs/plastic circle you are trying to attach it too.
 ...
...
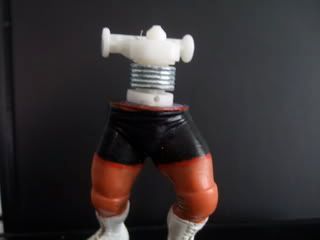
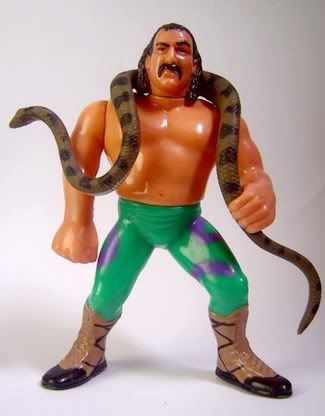
Just ignore the bad paint jobs and look at the differences in the plastic circles/mechanisms
Some Hasbro customisers have a rule of only using Hasbro figure parts… NO JAKKS HEADS. It’s your choice really, depending on whom you’re making. If it can be done with a Hasbro head, go for it. It will be easier in the long run. However, I use an array of different heads when making my customs. It’s all about experimentation for me. I remember before a ttl RVD fig came out, everyone was using crash holly heads. I decided to use a WCW Steve mcmichael head, looking back, there were better choices, but that’s what happens after doing this for 8 year
Paints are paints…
whether used on jacks or Hasbro’s, they do the same job. I use games workshop paints (the citadel ones used for warhammer).
I also use a can of white undercoat and sealer produced by the same company.
Sculpting:
This can be a saviour. If you are a customiser that only likes to use Hasbro parts, this can help in a big way.
This kind of clay is obtainable anywhere, due to being from the UK, I don’t know US brand names but there is usually 1 thread posted every other week on here asking ‘Whats sculpy’?
 ...
...
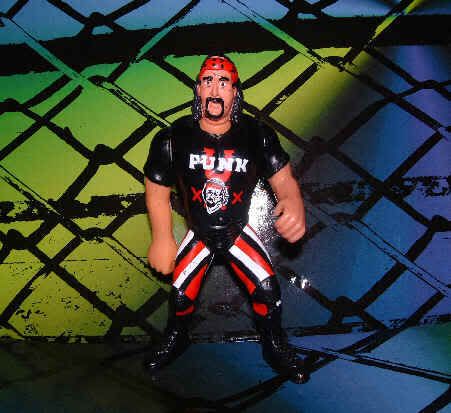
The above picture shows what a difference a small amount of clay can do. I added a tiny amount on the head for a headband and also enough to be able to give him a slightly older look around the eyes.
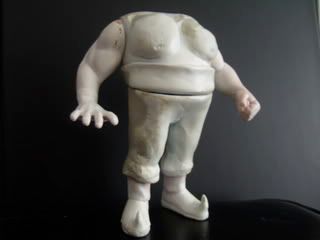
Below is a larger work in process, about 30% done… I used A LOT of clay, this used to be a series 1 Bossman figure, with different arms. It’s going to be Abdullah the butcher, or, it may end up being one of the head hunters…. “Update” Im going to redo the head completely, its defo going to be the butcher… Note, his man boobs could probs droop down a little more.. lol.
It’s a great way of covering mistakes too, if you end up chipping or cracking the torso when prying open with a screwdriver.
It might be worth using sandpaper at this point to smooth over a couple of rough edges and noticeable clay lines
As soon as its dry, undercoat it.
Like i stated earlier, I use a GW white spray, it means the paint you apply to the figure will stick better, look smoother and you wont have to drown the figure in the process. Paint the primary colour to the figure, in Abdullah’s case, I would use a brown for skin and a red for pants, only add detail after the second or third coat and remember to let it dry each time.
After you have fully painted the fig, use the sealer. It stops paint from chipping and gives it that classic Hasbro shine. DON’T OVER DO IT, hold the can at least 7-8” away and cover the entire fig in one go. (that’s just my opinion).
To break it all down:
The 10 step plan
Prepare… have a selection of paints, tools, clay, figures and patience
1) Decide who you want to make
2) Find the parts/figures you want to use after checking their value and if it really is a decent part choice, remember, all parts must fit.
3) Use a selection of tools to carefully pry the fig open if that’s whats needed.
4) Sand the figure parts to suit the customs needs if that’s whats needed, i.e. if the fig has wristbands, but the custom doesn’t need them, sand them off.
5) Put the parts back together, using super glue and/or modelling clay.
6) Modify the custom with clay if that’s whats needed.
7) Smooth over these areas with sand paper.
8) When happy, spray the figure with an undercoat and let it dry.
9) Apply paint, first the primary and then additional detail once the primary has dried.
10) When all has dried, spray in moderately with a sealer.
11) Post it on wrestlingfigs.com and let people bash the hell out of it, it might happen. Ignore useless comments and un-needed remarks. BUT listen to what customisers have to say, there are some nice people who do leave constructive criticism and it really does help in the long run!
Hope some of this helps, I know a lot of it is basic customising knowledge but a lot of it links specifically to Hasbro’s.
Take it easy, any questions, please feel free to ask.
One thing I do ask is please don’t send me PMs for recipes; they will be posted on here very soon from some of the best Hasbro customiseres around, keep an eye out.
*UPDATE*
I was asked about bubbles for hasbros customs. This is what i do:
Bubbles
The alternative to the above (which seems very professional i may add) is to simply buy moc figs in bulk. Now i dont buy moc hasbros to custom from, I buy figures from £1 stores (or $1 stores in your case) and seeing if they fit.
If you have a moc hasbro, measure the attributes of the 'outer bubble' (not the piece the figure fits in to), measure depth, width and height.
Once you have found something that would be bigger than the figure but not to big for the card, line up the fig so its in the correct stance against the backing card making sure its level and not on an angle.
Prod 2 very small holes in the carding, at either side of the figures waist line. I then use a product called 'tie its' from the UK. They are very thin plastic strips, about 2mm in height and 5" long. You can manipulate these very easily and its what i use to keep the fig in place.
So, to break it down.
1) buy cheap moc figure, making sure the bubble will fit a hasbro
2) line your fig against the card, in the correct position.
3) Add 2 small holes to the card at both sides of the figs waist.
4) Use a 'Tie it', apply around the figs waist, poke either side through the holes on the card, and tie around the back of the card.
5) You can even paint the tie it as they generally come in white, painting makes it blend in and not stand out so much.
Ive tried this once, it worked fine on a mankind custom, i got £18 on ebay (around $30 - $35), sorry i dont have any pics.
I think there will be other ways, but this for me was the cheapest, and it worked
~FOX~
Iv had alot of emails asking "how do i pop a hasbro torso" or, "whos head would work for.."
This post should hopefully clear some things up.
Thanks to "009" for letting me post this and also for the help Tommycoholic and Adrione for being an example to follow.
Welcome to a different side of customising, some say the cartoonier side; I would personally say the more nostalgic/intriguing side.
You cant just go to a store and buy a jakks fig, you can however get a random buzz every time you win a lot on eBay for a low price, or find 2 or 3 random hasbro figs for $0.50 at a yard sale. It’s something that drags you in. I used to customize ttls and the original BCAs but found myself needing a Hasbro fix. Cant explain why, but after you have finished your first one… you may understand the difference.
BREAKING AN ADAM BOMB FIG!! - Don’t do it.
If you’re not familiar with Hasbro’s and win a lot from eBay or whatever… please, for the love of god, don’t customise it straight away. Ask someone on here what they are worth. I am happy to help out with pricing/info/pics/general help for Hasbro questions but I may have to kill you if you paint a 123 kid into an x-Pac. Some are worth a lot of money, others arnt worth the postage.
Right, on to general tips:
Separating Hasbro figures can be a task. You need to remember that the inside of a Hasbro figure has A LOT of things going on compared to a typical jacks fig. Firstly, the mechanism: When you decide on which custom your going to make, also decide whether you want it to be playable, or not.
If you do want it playable, you will most likely want its ‘move’ to work. (i.e.: Tatanka’s body rotation double-armed clothesline).
Also, it can be tricky to successfully ‘not’ snap one of the pins on the inside of the torso; usually 4-6 plastic pins hold the front and back torso together.. Chances are, you will break them at first, but not to worry, as long as nothing prevents the front and back of the torso from closing back together (no gaps down the side or around the shoulders of the fig) then super glue will work just fine.
Popping:
Some people suggest boiling the figure as the plastic softens up and can be easier to manipulate. I personally use a Stanley Knife (heavy duty craft knife) and start at the shoulder of the fig, carefully slicing the joint. I pry it open, SLIGHTLY… and continue to do this around the entire body. Sometimes this will be enough for the torso to pop open.. If so, great.
If that doesn’t work… probably wont! I use a skinny flat-headed screwdriver after using the knife. When I say skinny, I mean the tip of the screwdriver needs to be as thin as possible… sharper, if you will.
The above selection of tools is vital in my opinion; add sand paper or a selection of metal files to smooth over unwanted sections and paint.
NOT ALL TORSOS WILL FIT OTHER LEGS.
There is a circular peace of plastic moulded at the top of MOST legs. (Very similar to TTL and most other jacks figs). It’s just a point for the torso to clip around and allow rotation once joined together. Some ‘plastic circles’ are bigger than others, which means the ‘hole’ at the bottom of the torso which clip around these ‘plastic circles’ will fit specifically. I think (compare macho king - purple trunks and British bulldog) this will give you a basic example.
There is away around this: If you have a torso and the hole is to small for the plastic circle, simply sand the hole so it gets larger, use I craft knife if needs be, but be careful not to chip to much plastic off, just in case it then becomes to big for the legs/plastic circle you are trying to attach it too.
...Just ignore the bad paint jobs and look at the differences in the plastic circles/mechanisms
Some Hasbro customisers have a rule of only using Hasbro figure parts… NO JAKKS HEADS. It’s your choice really, depending on whom you’re making. If it can be done with a Hasbro head, go for it. It will be easier in the long run. However, I use an array of different heads when making my customs. It’s all about experimentation for me. I remember before a ttl RVD fig came out, everyone was using crash holly heads. I decided to use a WCW Steve mcmichael head, looking back, there were better choices, but that’s what happens after doing this for 8 year
Paints are paints…
whether used on jacks or Hasbro’s, they do the same job. I use games workshop paints (the citadel ones used for warhammer).
I also use a can of white undercoat and sealer produced by the same company.
Sculpting:
This can be a saviour. If you are a customiser that only likes to use Hasbro parts, this can help in a big way.
This kind of clay is obtainable anywhere, due to being from the UK, I don’t know US brand names but there is usually 1 thread posted every other week on here asking ‘Whats sculpy’?
...The above picture shows what a difference a small amount of clay can do. I added a tiny amount on the head for a headband and also enough to be able to give him a slightly older look around the eyes.
Below is a larger work in process, about 30% done… I used A LOT of clay, this used to be a series 1 Bossman figure, with different arms. It’s going to be Abdullah the butcher, or, it may end up being one of the head hunters…. “Update” Im going to redo the head completely, its defo going to be the butcher… Note, his man boobs could probs droop down a little more.. lol.
It’s a great way of covering mistakes too, if you end up chipping or cracking the torso when prying open with a screwdriver.
It might be worth using sandpaper at this point to smooth over a couple of rough edges and noticeable clay lines
As soon as its dry, undercoat it.
Like i stated earlier, I use a GW white spray, it means the paint you apply to the figure will stick better, look smoother and you wont have to drown the figure in the process. Paint the primary colour to the figure, in Abdullah’s case, I would use a brown for skin and a red for pants, only add detail after the second or third coat and remember to let it dry each time.
After you have fully painted the fig, use the sealer. It stops paint from chipping and gives it that classic Hasbro shine. DON’T OVER DO IT, hold the can at least 7-8” away and cover the entire fig in one go. (that’s just my opinion).
To break it all down:
The 10 step plan
Prepare… have a selection of paints, tools, clay, figures and patience
1) Decide who you want to make
2) Find the parts/figures you want to use after checking their value and if it really is a decent part choice, remember, all parts must fit.
3) Use a selection of tools to carefully pry the fig open if that’s whats needed.
4) Sand the figure parts to suit the customs needs if that’s whats needed, i.e. if the fig has wristbands, but the custom doesn’t need them, sand them off.
5) Put the parts back together, using super glue and/or modelling clay.
6) Modify the custom with clay if that’s whats needed.
7) Smooth over these areas with sand paper.
8) When happy, spray the figure with an undercoat and let it dry.
9) Apply paint, first the primary and then additional detail once the primary has dried.
10) When all has dried, spray in moderately with a sealer.
11) Post it on wrestlingfigs.com and let people bash the hell out of it, it might happen. Ignore useless comments and un-needed remarks. BUT listen to what customisers have to say, there are some nice people who do leave constructive criticism and it really does help in the long run!
Hope some of this helps, I know a lot of it is basic customising knowledge but a lot of it links specifically to Hasbro’s.
Take it easy, any questions, please feel free to ask.
One thing I do ask is please don’t send me PMs for recipes; they will be posted on here very soon from some of the best Hasbro customiseres around, keep an eye out.
*UPDATE*
I was asked about bubbles for hasbros customs. This is what i do:
Bubbles
The alternative to the above (which seems very professional i may add) is to simply buy moc figs in bulk. Now i dont buy moc hasbros to custom from, I buy figures from £1 stores (or $1 stores in your case) and seeing if they fit.
If you have a moc hasbro, measure the attributes of the 'outer bubble' (not the piece the figure fits in to), measure depth, width and height.
Once you have found something that would be bigger than the figure but not to big for the card, line up the fig so its in the correct stance against the backing card making sure its level and not on an angle.
Prod 2 very small holes in the carding, at either side of the figures waist line. I then use a product called 'tie its' from the UK. They are very thin plastic strips, about 2mm in height and 5" long. You can manipulate these very easily and its what i use to keep the fig in place.
So, to break it down.
1) buy cheap moc figure, making sure the bubble will fit a hasbro
2) line your fig against the card, in the correct position.
3) Add 2 small holes to the card at both sides of the figs waist.
4) Use a 'Tie it', apply around the figs waist, poke either side through the holes on the card, and tie around the back of the card.
5) You can even paint the tie it as they generally come in white, painting makes it blend in and not stand out so much.
Ive tried this once, it worked fine on a mankind custom, i got £18 on ebay (around $30 - $35), sorry i dont have any pics.
I think there will be other ways, but this for me was the cheapest, and it worked
~FOX~